Hiking Half Dome Trail Yosemite Park - Tips, Trails, & Attractions
The Yosemite Half Dome is one of the most popular hikes in the National Park-not to mention, one of the most popular hikes in the world. This hike is so popular that Yosemite has had to implement a lottery permit system for those who are going along the popular cable ascent route.
At nearly 5,000 feet above Yosemite Valley, the Half Dome was once thought to be completely inaccessible, though the summit was eventually reached in 1875. It's a rigorous hike, offering excitement and adventure to the people who decide to summit. Hiking the Half Dome can be done within a day, while still presenting a challenge to more experienced hikers and mountaineers.
Hiking the Half Dome Quick Facts
- Location - Happy Isles at Yosemite National Park
- Length (miles) - 14–23 miles round trip depending on route taken.. The Mist Trail is the shortest round trip route, coming in at 14.2 miles. If starting from the Little Yosemite campground, the round trip trek is a strenuous 7 miles.
- Est time of completion - 10–14 hours
- Elevation gain - 4,800 feet
- Difficulty level - Strenuous/advanced
- Best time to go - Between Memorial Day in May and Columbus Day weekend in October
- Permit costs - $10 per application (not per person), additional $10 per person when at Yosemite.
Hiking to the Top of Half Dome - Trails and Routes
Use this list of Half Dome trails and routes to plan out your adventure when you visit Yosemite Valley.
Below is a list of the most popular route that is taken to get to the top of the Half Dome, though there are other junctions along the way, making the total length of the hike anywhere from 14–16 miles round trip.
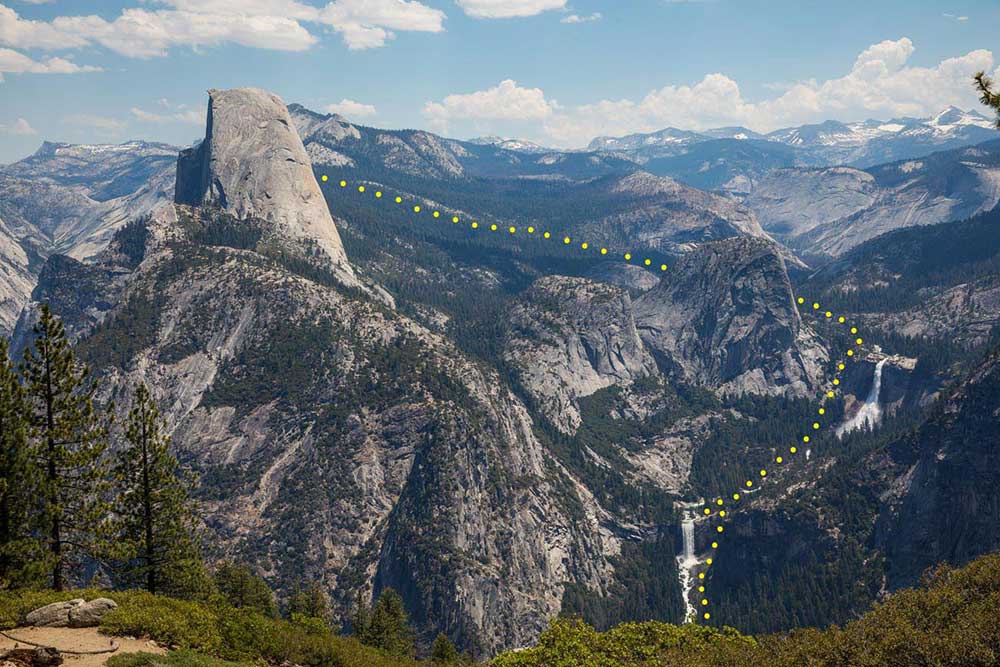
Caption: Preview of Half Dome Route
The Mist Trail featuring Vernal Fall and Nevada Fall
Start at the Mist Trail and you'll pass through stunning scenic views, with Vernal Fall and Nevada Fall in the background. It follows the Merced River up hundreds of steps that takes you to the top of Vernal Fall.
From there, you'll continue on to another steep section of stairs that takes you to the top of Nevada Fall. The water through here is very swift and cold. Getting just to the top of Nevada Fall is considered to be a difficult day hike-but not even half the distance to the top of the Half Dome.
Little Yosemite Valley

After you get through Nevada Fall, you'll move from cold and wet waters to a sandy, hot section that runs through Little Yosemite Valley.
It's critical to keep yourself hydrated during this part of the trail, as it is very hot and strenuous, causing dehydration to happen quickly. As you climb out of LIttle Yosemite Valley, you're halfway to the top of Half Dome.
This is far into Yosemite's designated wilderness area, so be aware of your surroundings and take in the environment's local animals and plants.
Sub Dome
After you pass Little Yosemite Valley, the next part of the Half Dome hike is trekking through a dense forest that eventually leads to the Sub Dome. The Sub Dome has a similar amount of steps as the Mist Trail, but at this point in the hike, you're at 8,000 feet in elevation.
This makes the climb substantially hard due to oxygen levels. Not only that, but this is the part of the trail where hikers really become tired and need endurance to finish it out.
If the weather is cooperative, the rest of the trail takes you to the Cables to summit Half Dome.
The Cables & the Summit of Half Dome
The final section of the Half Dome hike is the cable system-a mountaineering component. These cables take you up a steep section and can intimidate those who are scared of hikes. But, when you get this close to the top, it's time to conquer your fears and reach the summit.
The cables are in place from around Memorial Day throughout the end of September. These are vertical exposed cables that take you to the top of the Half Dome.
Many find it harder to go down the cables than up. The situation can turn precarious during any type of inclement weather, including light rain.
Hiking Back Down Half Dome
Once you've enjoyed the sights and triumph of making it to the top of Half Dome, the adventure isn't over yet-you're only halfway done.
The return trip is easier than the first half, but it's still a strenuous trek, and you'll be tired from high-elevation oxygen levels, climbing, and hiking for hours. As you hike back down Half Dome, you'll need to make sure that you still have adequate supplies for the return journey.
WIth over 5,000 feet to descend and seven miles to hike back, many hikers are exhausted. It's important to get an early start so that you can get some rest before you start your way down.
Make sure you have enough supplies, like water, calorie-dense foods, and supplies like flashlights or headlamps in case it starts to get dark.
Notable Attractions and Sightseeing Spots Along the Way

Vernal Fall
Vernal Fall is a popular, but strenuous destination, around 2.5 miles round trip via the mist trail. The John Muir and Mist Trails offer beautiful, up close views of Vernal Fall, along with spectacular views across Yosemite Valley. Once you get to the top of Vernal Fall (around 1000 ft in elevation gain), hikers can look straight down the 317-foot waterfall and see the water flowing from a different perspective.
Vernal Fall Footbridge
The first paved mile of both the John Muir Trail and Mist Trail is one of the busiest sections throughout the area and accesses the Vernal Fall Footbridge. The footbridge is an uphill trek, but offers hikers views along the way, like Merced River and across Yosemite Valley. .8 miles into the footbridge hike has optimal views of the falls and the John Muir and Mist Trails then diverge around .2 miles from the footbridge.
Nevada Fall
Nevada Fall is accessible from both John Muir Trail and Mist Trail. The top of Nevada Fall is a 5.4 miles round trip via the Mist Trail. It's a strenuous hike that generally takes around 5–6 hours to complete. After hikers have passed the Vernal Fall Footbridge, they can take the next junction and go through the John Muir Trail, or continue uphill on the Mist Trail. The waterfall is at its fullest in spring and summer. This hike is a loop and visitors can make their way back via the Mist Trail or John Muir Trail.
Clouds Rest
Clouds Rest via Sunrise Trailhead has an elevation that is over 1000 feet higher than Half Dome and massive walls sloping down into Tenaya Canyon. Clouds Rest's peak can be seen from all over the park. It's a strenuous day hike that takes around 7–10 hours to summit and and back. Hikers experience approximately a 2000-feet elevation gain in two separate pushes and the trail is 13 miles there and back.
Olmsted Point
Olmsted Point is a quick, 15–30 minute hike at 8,300 feet (from trailhead). It's only a quarter of a mile round trip, but is one of the most popular areas for visitors. It's just as crowded in the parking lot as it is at the end of the trail, and is accessible for all levels of hikers. The draw of Olmsted Point is that there's so much scenery to take in compared to the level of effort required. Visitors can see a closeup view of Clouds Rest, Half Dome, Tenaya Lake, granite domes, and forests, alpine lakes, and glacial views.
What are the Crowds Like
Because the Half Dome is such an iconic Yosemite hike, you can expect there to be a high crowd factor.
In fact, the high amount of crowds has made Yosemite institute a permit system due to bottlenecks. For those going the cable route, the permit-reservation system has been especially useful to prevent overcrowding.
In 2012, Yosemite switched to a lottery system for permits, making it slightly more difficult to receive one, but has substantially reduced crowding.
Before Start Your Half Dome Hike
Before you start your Half Dome trek, make sure you're prepared with all of the information and supplies you'll need to have a safe and fun trip.
Permits and Passes
Permits are required to climb the subdome and the subdome cables.
To summit the Half Dome, you'll have to have a permit to finish your hike. Permits are given in a preseason lottery that covers the entire summer hiking season. This lottery system awards 300 permits per day, giving 225 to day hikers and 75 for backpackers.
Because the Half Dome is such a popular hike, it can be hard to receive them, so be sure to plan when you are going to try to get into the system. This Half Dome permit statistics graph gives a good sense of your odds of receiving a permit when you're applying in the lotteries.
Cost for submitting a permit application is a non-refundable fee of $10, with an additional $10 fee when you receive a permit. More information about permits, fees, and can be found at the Yosemite National Park official site.
Parking
Hikers generally start their hike from Happy Isles (shuttle stop #16), about a half mile from the trailhead parking lot, or around three quarters of a mile from Curry Village that has parking available. You'll need an advanced reservation to park and spots are difficult to get in the summer.
Alerts and Current Information
The National Park Service site keeps visitors up-to-date on the latest alerts and information regarding hiking Half Dome. Depending on the situation, there will be weather warnings, reservation restrictions, and notice of required reservations.
Safety & Preparation for Your Half Dome Hike
Hiking the Half Dome is for advanced hikers and is a strenuous 15–17 mile route. You'll need to consider adequate hydration and nutrition, preparation for elevation changes, exhaustion, use of the cable section, weather, and potential injuries.
Gear to Bring on the Half Dome Hike
- Extra clothing - The temperatures will vary depending on where you are on the hike. Bring layers, extra socks, and sun protective gear.
- Rain gear - In case the weather turns on you, a shell or packable rain jacket will work as additional protection from the elements.
- First aid kit - Your first aid kit should be filled with over the counter pain medicines, antihistamines, gauze, topical antibacterial ointment, bandaids, tweezers, alcohol pads, sunblock, and bug spray.
- Whistle - A whistle can help to scare wildlife away or let others aware of your location if you find yourself in a precarious situation, lost, or separated from your group
- Flashlight, headlamp - Hikers are often caught off guard at the end of the hike if the sun has set before they get back to the trailhead. Remember to bring a flashlight and headlamp (and extra batteries) to stay safe.
- Optimal footwear - Wear hiking shoes that have good traction, as there are spots where terrain will be rocky, wet, and slippery. This is not the type of hike where tennis or running shoes will cut it.
- Water - It's recommended that hikers drink at least a gallon of water during the Half Dome hike, or four one-liter bottles. Many like to keep their electrolytes up through supplements that contain sodium, magnesium, and potassium to stay properly hydrated. Keep in mind that dehydration is a safety risk, so in addition to adequate hydration, a sunhat can help keep you from overheating.
When using a filter, you can use some of the water sources in the area to keep your water bladder full. The Merced River in Little Yosemite Valley is the last reliable water source of the hike, before you make it to the subdome and cable system.
- Food - Adequate calories are critical when completing such an advanced hike. Make sure that you have planned accordingly and have several high protein, high carb, and high calorie snacks that you can eat on the go. Foods like jerky, peanut butter, trail mix, granola bars, bananas, and more are good options for getting boosts of energy when you're starting to feel burned out.
Looking for a more substantial meal? Backpacking stoves are a great option to get in extra calories to help you reach the summit and back. You can take a quick break, heat up a dehydrated meal, and eat something warm and nutritious as you prepare to continue your adventure. Take a look at our Essential Hiking Gear List and Ultralight Backpacking Gear Essentials to see how you can properly optimize your pack to bring enough food prep items.
Weather and Exposure on the Half Dome Hike
Weather can roll in quickly the higher up on the hike you are, so it's important to check weather before the hike and ensure that you're going during the right season.
If there is any kind of inclement weather, it will not be possible to use the cable system to summit the Half Dome. At these high elevation levels, weather changes quickly and can turn dangerous.
Severe weather may be a real threat on your travels and may cause you to have to turn around before you complete the hike.
Another environmental consideration is sun exposure. Higher elevations make it easier to burn, dehydrate, and succumb to the various elements.
Prepare for this situation with plenty of water and electrolytes, calorically dense foods, sunblock, hates, light reflecting and moisture wick clothing.
When is the Best Time to Hike Half Dome
Due to the fact that you can't climb Half Dome unless the cables are up, adventurers have between Memorial Day in May and Columbus Day weekend in October.
Because the crowd factor is so high, you're likely to find a busy trail no matter when you go. With the current permit system in place, weekdays and weekends are equally busy. However, permits are generally easier to get during the week and in September and October.
The waterfalls, though, are fuller during the early season. Avoid the Half Dome on days where there is a possibility of inclement weather-the cables can potentially become dangerously slick.
The Half Dome Hike is and Adventure of a Lifetime
If you're accurately prepared and are in great hiking condition, hiking the Half Dome will be an experience to remember. The dazzling scenery, waterfalls, wildlife, and crystal clear lakes, all
with gorgeous peaks in the background is an adventure you won't soon forget.
It's essential to be appropriately prepared with water, food, and the overall stressors your body will experience. However, once you reach the summit, the extensive planning and preparation will be worth it.


